Feeds:
Posts
Comments

Posts Tagged ‘sewing’

Recently I made a King’s Landing Handmaiden dress from the ever popular series Game of Thrones. To complete the look, I needed a leather hand-painted belt. This is my step-by step process on how to construct said leather belt. You will need copy paper, a pencil, 3-5oz veg tan leather, leather scissors or a sharp box cutter knife. A leather punch with multiple sizes, a mallet, leather rivets and a leather rivet-setter tool, grommets, a grommet setter, some cord, liquid acrylic paints, and acrylic varnish. Optional leather tooling stamps.

IMG_1127.JPG

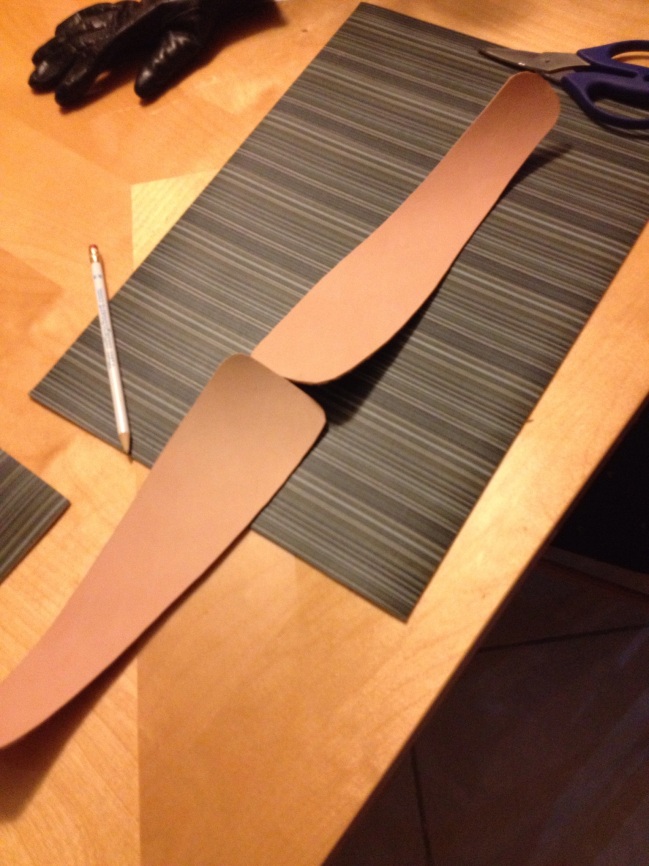
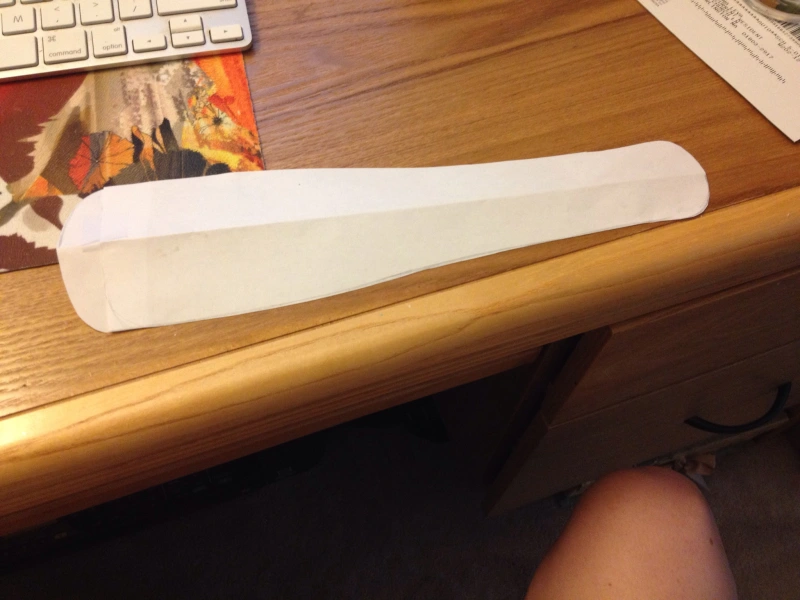
Start by drafting a pattern with a piece of paper. You can customize the size and shape to accommodate your own measurements. This section represents HALF of the belt. One half, on me, was roughly 10 inches long and 3 inches tall. I recommend experimenting and holding it up to your waist to see what looks good on you. If you have a long torso like me, try a tall belt. If you have a short torso, a short belt may look best.

IMG_1128.JPG

Trace the two halves of your belt onto 3-5oz vegetable tanned leather. Cut out using leather scissors or a box-cutter knife. I find that Scissors are way easier to get a clean cut with. You must take extra care with a knife to keep your edges clean.IMG_1129.JPG
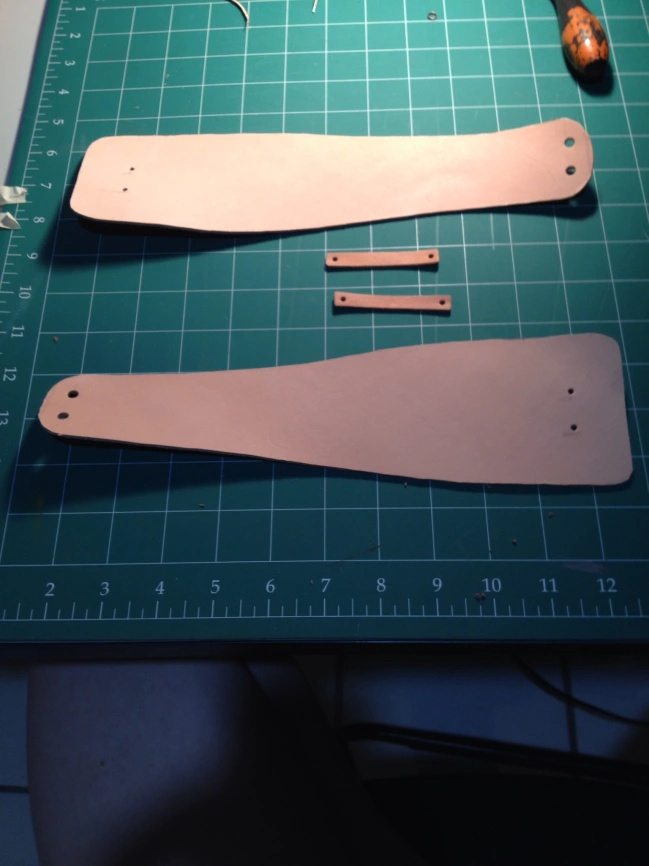
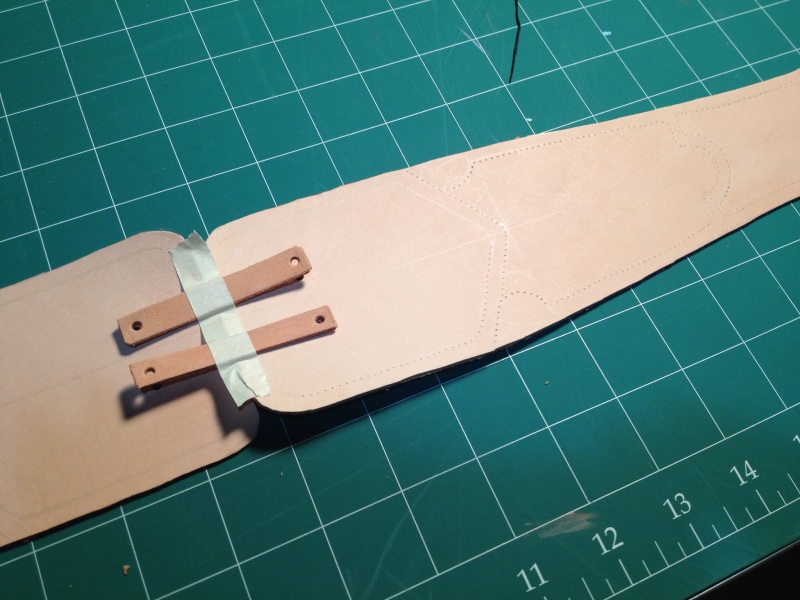
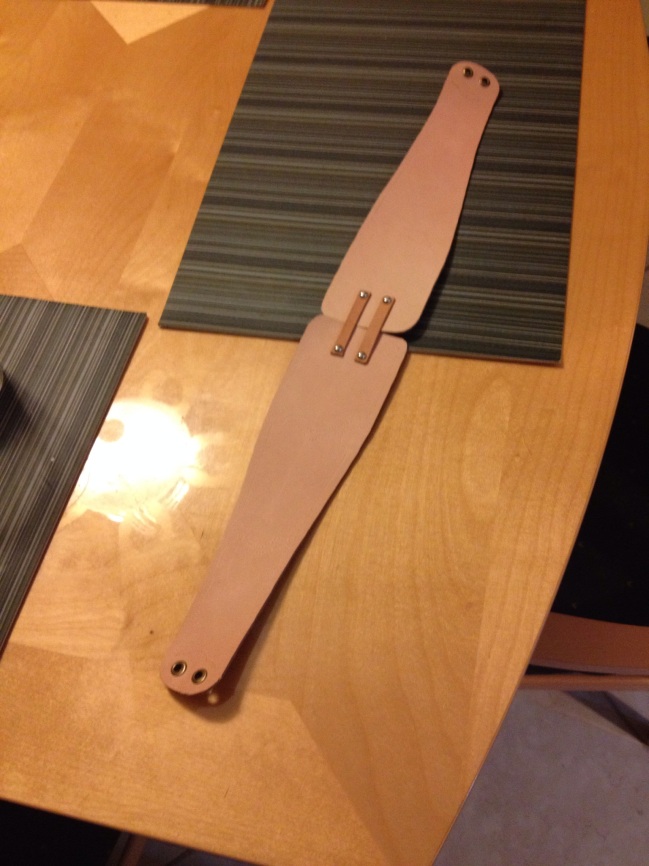
To connect the two halves in the middle, cut some connection pieces for the same leather. I chose to connect the two halves with two thin rectangular strips of leather, but you may choose to use one thicker strip.  Line all the pieces up and mark where to punch holes for your hardware. The smaller holes on the wide side of the belt are for rivets that will join the two halves together. You should punch a hole just big enough to slide a rivet through, and no larger! The larger holes on the thinner end of the belt are for grommets which you will use to lace up the belt when it is complete.

IMG_1130.JPG

At this stage you may add any decorative tooling. I’ve done a simple stippling stitch pattern, which I only loosely followed while painting. It adds an extra level of texture and intrigue to the belt but it is not an essential step.

IMG_1131.JPG

Time for hardware! Rivet the belt together and insert and secure grommets. You will need a rivet setter and a grommet setter. You can’t make it look pretty with make-shift tools.

IMG_1138.JPG

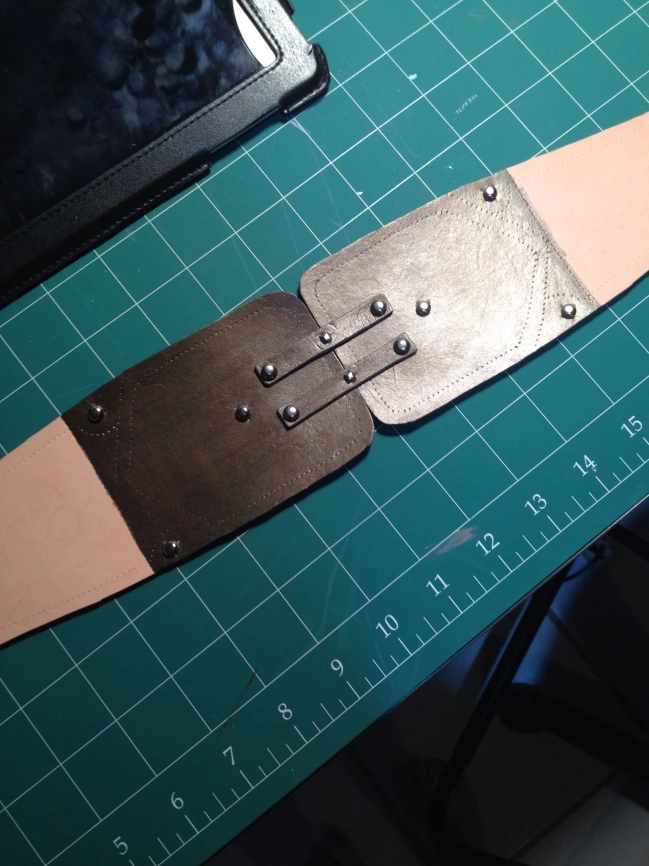
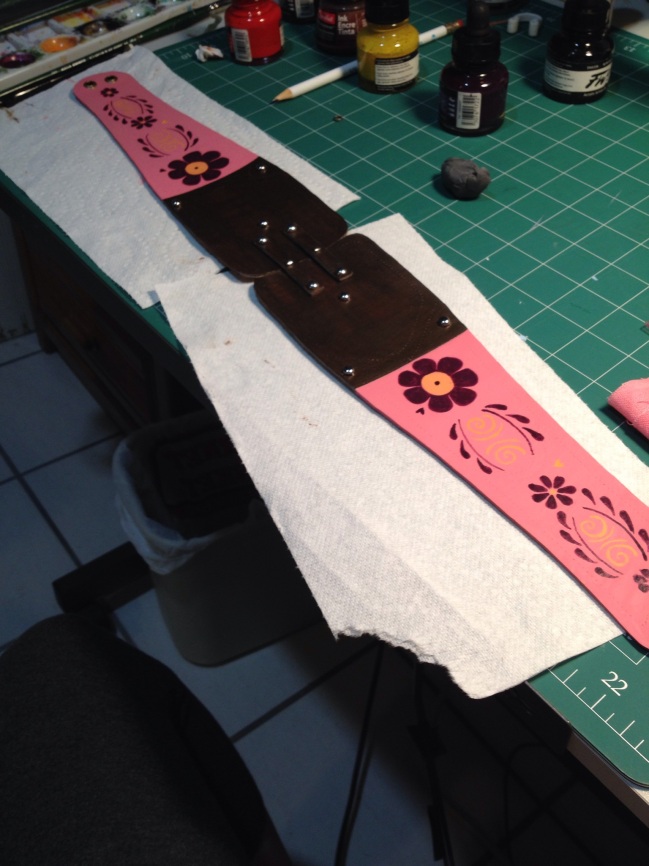
Begin painting and embellishing! I recommend painting before applying any studs or embellishments. I paint my leather with liquid all purpose acrylics, and seal with an acrylic varnish. They come in a range of finishes; I prefer glossy for most projects. The paint that I mixed for the center of the belt had a little shimmer to it, which I think looks nice on a feminine character, but some costumes do not want to look shimmery.

IMG_1187.JPG

Hand-painted details will make your belt really stand-out. Here I did a base coat (or two) of pink over the most of the belt and let it dry completely overnight before painting on the flowers. You can draw lightly over dry acrylics with a pencil to plan out your design. Then paint right over the pencil. When the design is completely dry, use a kneaded eraser to lift up any pencil that is still visible. It should come off pretty easily–don’t scrub too hard. Once all the pencil is gone you can varnish the whole belt.
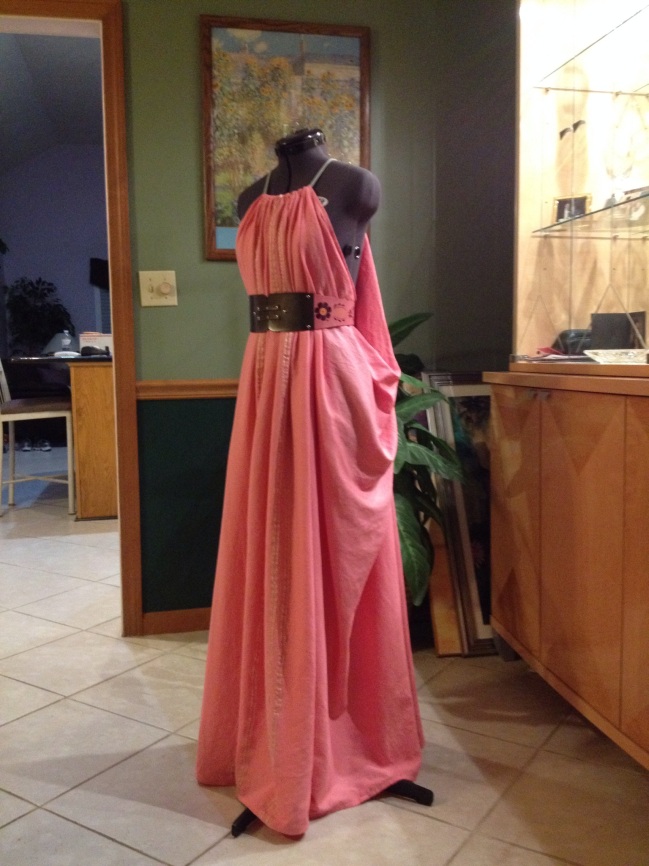
IMG_1189.JPGHere is the belt with the completed handmaiden dress. It really pulls the look together, right?
Read Full Post »

Long time no post! I’ve missed a few costumes that I’ll have to get up here soon…but for now, this is what I’m working on at the moment. It’s a handmaiden gown from Game of Thrones! I plan to wear it to this year’s Granite State Comic Con (2014), which happens to have a little GoT theme going on….They have several guests from the show attending, and will be holding quite the hand-full of GoT panels, as well as an official 21+ GoT after-party.

IMG_1161.JPG

The handmaiden dress is a lot more simple than everyone assumes it is. The most difficult part of the dress so far was finding the right kind of fabric, in the right color, and with enough yards available to make three dresses (one for myself, and two for friends). We had to order online to find enough yardage, which means there was no feeling the fabric before selecting it. The color is lovely, but ideally we would have selected a fabric that was a little more light-weight. This is a linen-rayon blend, and has a stiff hand, though a nice drape. It’s a dream to work with but isn’t quite as airy as the dresses look on-set.

IMG_1149.JPG

These pictures are of my initial drape: no hems or anything, just 4 yards of fabric draped on my dress form with an unfinished leather belt. It is an awful lot of fabric. The dress will weigh more than 2 pounds when its done, which may not sound like a lot, but believe me it’s more than your everyday clothes weigh. My friends and I decided to be handmaidens because we assume that there will already be a whole mess of main characters from GoT attending this con. Maybe by being generic background characters, we may actually stand-out. We will also be incredibly comfortable.IMG_1162.JPG

Read Full Post »

Renaissance Fair Season is upon us! I love spending a day out in the woods with the  fairies and jesters, celebrating the late summertime magic. The first Fair on my list is King Richard’s in Carver Mass, and to make sure I make the most of my Fair day, I am adding a few new pieces to my costume wardrobe. The most ornate of which is this handy little bag. This small glitzy purse was inspired by the Habib Bags offered by long-time fair vendor “Moresca.” Their work is beautiful, but hardly within budget when I can make some of the pieces, or something similar myself.

20130812-103710.jpg

All of the fabric for this purse, the red tassels, black and gold trim, and the broach were all things that I already owned in my craft bins. The only things I had to buy new were the multi-colored loop trim and the very ornate gold curtain trim with tassels that you see running through the middle. However because I only needed a small cut of each, and could pattern the whole thing myself, this bag cost me under $10 to make! Not counting my time of course. It even has a lining.

20130812-103754.jpg

I also recently made a new belt and mini-bodice which I wore to Connecticon. Made from green brocades and satins, with black and gold trim. Hand beaded and laced with black suede through brass grommets, this matching set is extremely versatile–especially the belt–because it is fully adjustable. I can wear it over leggings or a petticoat and two bustled skirts and it sits just fine.

20130812-103724.jpg

To spice these two pieces up for the fair I added some black and gold chains to the belt and the bodice. I’m banking on warm weather for fair day so that I can wear these chains on an open midriff. I’ll wear a shawl if I have to but the chains do not look as nice over a chemise. Anyone have any other ideas on how to winterize this bodice? I have arm socks or I could always go full cloak, but I don’t really want to cover the whole costume up. Side note–I got these chains on ebay for wicked cheap and they’re REALLY nice. I think they’re aluminum. Very pliable and easy to work with, however they are a nice thick gauge and feel quite strong when tugged on! I’m more concerned about my stitches failing than I am the chains, which is more than I expected for such cheap ebay notions.

20130812-103818.jpg

My favorite method of preparation for the fair involves spending more time outside. This is such a lovely time of year, and feeling a nice breeze on my skin every once and while keeps me motivated. The only other pieces of my costume that I want to update now, is to add a simple black fringe apron to sit under my fancy bag. I think it will frame it nicely and add an even more heavily layered look to my already voluminous skirts.  I’ll be sure to post more pictures when the whole outfit is done!

Don’t forget to subscribe to my main blog for more posts on ALL things arts, crafts, and sewing (not just the cosplay stuff).

Thanks for reading. 🙂

Read Full Post »

Hey readers,

As per requested, today I have some low-resolution progress pictures of my upcoming steampunk which will debut at this year’s New York Comic Con. These pictures were either taken on my cell phone, web camera, or in low light so I apologize for the grain or blurriness, but at least the debut will be that much more special for the image quality.

This first picture of a progress picture of the skirt. I drafted the pattern myself and it involves a lot of ruffles! The skirt is now complete and this garment alone took about 30 hours to complete.

Here’s a picture of the incomplete bustle, which is now also complete. I once again drafted my own pattern and constructed the piece myself using some beautiful brocades and a textured satin.

This picture isn’t exactly of progress but it is a compilation of patterns that I ALMOST used. There was a pattern sale going on while I was constructing my steampunk, and while I only used one of the patterns featured here for the top of the costume, I got a lot of inspiration from the pictures and did a lot of sketching and revising on their account. They would all make great steampunk patterns and hopefully they can be useful to you.

This is a quick shot of the vest in progress. Those laces will not be final and are just to test what kind I need. Not that kind, that’s for sure. The laces will ultimately go down my whole back. You can also see some of the back of the finished skirt. That’s my process update for now! More to come later this month.

Read Full Post »

Hey everyone,

I have a little treat for you today. This October my cosplay group MetaCosplay and I will be debuting a new steampunk group at New York Comic Con. Here I have a fashion sketch on which I am basing my costume. I did this little doodle in pen and colored pencil one day while I was trying to work out all the colors. Now, I may not end up following every detail to the letter; I edit costumes heavily during construction as I see exactly the way things fall. In fact this is not my preliminary sketch by any means, but actually my third or fourth revision. But seeing as I am already half way into this costume’s construction, I think that it will come out looking pretty close to this particular sketch.

This method of costume planning may be helpful for you to see if you like to make original works. I always start with a sketch, even when cosplaying an existing character. I can better get my head around a costume’s construction if I draw it out myself, even if I know exactly what it is going to look like because I am following another’s design. But in the cases of original costumes, I find sketching and re-sketching to be an essential part of the process.

Here are some tips for designing your own original costume:

1. Start with the silhouette. Details, in the beginning are not important. Start with the general shape of the costume, and chip away at it as if you were carving a block of wood.

2. Have a color scheme in mind from the start. Don’t just make two garments in two random colors and hope that you can find a third color to tie the two together. Have an idea of a color family that you want to stick to. If you do get in a color pickle, remember the neutrals. Neutrals help tie together colors that seem totally unrelated.

3. Look at what you already have to work with. Dig through your fabric bin at home, get out all your old patterns, and see what undergarments and accessories you can already use to cut down on your work and expenses. I’m not saying you should assemble things you already own and call it a “new” costume, but if you already have a boat load of blue fabric, maybe you should consider using blue in your design. If you already have a hoop skirt, you can achieve great skirt fullness without that added expense. Etc.

4. Remember that light colors make you look bigger, and dark colors make you look smaller. Keep this in mind when placing your colors on the body. If you want your waist to look smaller, don’t wear a yellow belt. If you want your shoulders to look wider, don’t wear a black sweater.

5. Don’t forget the footwear. Shoes may not be the star of your costume but they can ruin the illusion if they don’t fit the style. For an original costume, why not look at the shoes you already have and design something that goes with? Or you can use your costume as justification to buy shoes that you’ve wanted anyway. Unless you have extra money to burn, don’t buy shoes that you will only wear once for an original costume. You have flexibility here! So flex.

6. Be realistic about what your body will look like when the costume is done. Don’t design a risqué costume with the intension of losing weight. Don’t make a costume a size bigger because you plan to “bulk up.” Even if you manage to lose or put on the weight, it doesn’t mean you are going to feel any different in your skin. Design a costume that you would be comfortable wearing TODAY. If you look even better in it in three months, that’s great.

One final thought: I always like to make things that I can wear on multiple occasions and with multiple costumes. This isn’t always possible, especially with statement pieces or costumes that are made as one big piece. But things like your standard white bloomers, khaki adventure pants, a white chemise, or a black belt are things that can act as a base for thousands of costumes. Try working some of these basics into your design and then when you’re in a pinch for a halloween costume, you’ll have plenty to start with.

Read Full Post »

Remember that skirt I posted in this post? Well I told you I had added channels inside the seams to put draw-strings through so that I could bustle and change the skirt to fit the occasion, and now, I have pictures to share!

Here is that very same skirt with the drawstrings tied up. I bought some extra long shoe laces off of ebay, and strung them through the channels. When the drawstrings are untied, the skirt hangs at its full length, but when you pull the drawstring, the skirt gathers around it to form this stunning bustle.

Here is a close up,

And from the other side. The skirt can’t be made super short, but it the drawstring can pull it up to about my knees, if I wanted.

Yup, I’m very happy with how it turned out.

Read Full Post »

Here is a free pattern for the mini garrison hat that I recently posted. The pattern isn’t for a miniature hat, but you can scale it to be whatever size you want. click here to view the PDF –> garrisoncap

See more of the garrison hat that I made by viewing this post. 


Read Full Post »

Free pattern: Cloak

Here is a free pattern for making a cloak. It’s very simple.

You can either make your cloak one thickness and hem the edges, or you can cut two layers for a lining. You sew the two pieces together around the edges, right sides together, leaving a space to turn the piece inside out. Enjoy!

Read Full Post »

Because I clearly don’t have enough other work to keep me busy (sarcasm) I decided to make a three-tiered Lolita skirt in order to use up some of the fabric I have left over from my past costumes. I have TONS of fabric. Either I bought too much or I found a sale or I  dismantled old clothes for their fabric, and I have ended up with three big bins worth of extra fabric. Some of it is in big pieces and most of it in small scraps. A skirt like this was a good way to use up some fabric without requiring one continuous piece.

The skirt was really simple to make. I used the waist band from a skirt pattern that I already had lying around, and I made my own “pattern for the rest of the skirt” Basically, the first ruffled tier is 2-times my waist (waist being where the skirt would sit above my hips, and not my waist at its smallest), the second tier is 3-times my waist, and the third tier is 4-times my waist.

I made the skirt red, because I had a lot of red fabric. And I put lots of bows on the side because I just learned how to make those bows, even though they’re like the simplest thing ever, and I really like them…so I put on seven….

I also added some black lace on the bottom because I do love black and red.

Read Full Post »

B5371

Butterick B5371. If you have scraps and remnants of imitation leather, vinyl, PVC, brocade, or any other type of sturdy upholstery fabric, you need this pattern. It is just wonderful. This history inspired accessories pattern pack comes with 9 easy and quick projects. Because of the nature of these heavy-duty fabrics, little hemming is required, instead, you will spend your time fusing the lining to the front, and simply edge-stitching the pieces into permanence.  This is also a great pattern pack if you have a bunch of extra cord, eyelets, and D-rings lying around because the fun projects do require a lot of these.

In total, this pattern offers four different style pouches, a waist corset, a waist belt, a normal pants belt, and two different style arm bracers/ bracelets.  So far I’ve complete two of arm bracer ‘B,’ and am half way through the construction of waist belt D. The arm bracers, which were constructed out of pleather, took about 2.5 hours each. Not bad for such a cool item!! And I probably could have made them even faster the third time around. I’m making the waist belt out of a marvelously shiny PVC. I can’t wait to finish make all of these things and FINALLY use up all the remnants in my sewing bins.

Read Full Post »